2006 note: Keep in mind that this was written in 1988 (for example, before the advent of 2-liter soda bottles), and it was the first comprehensive look at big wall climbing gear and techniques. Much was refined when I wrote How to Rock Climb--Big Walls with John Long, but the essence remains the same.
Advanced Wallcraft
By John Middendorf
illustrated by John McMullen
published by: A5 Adventures, the big-wall supply shop
Copyright 1988
Dedication
Dedicated to the folks in
Introduction
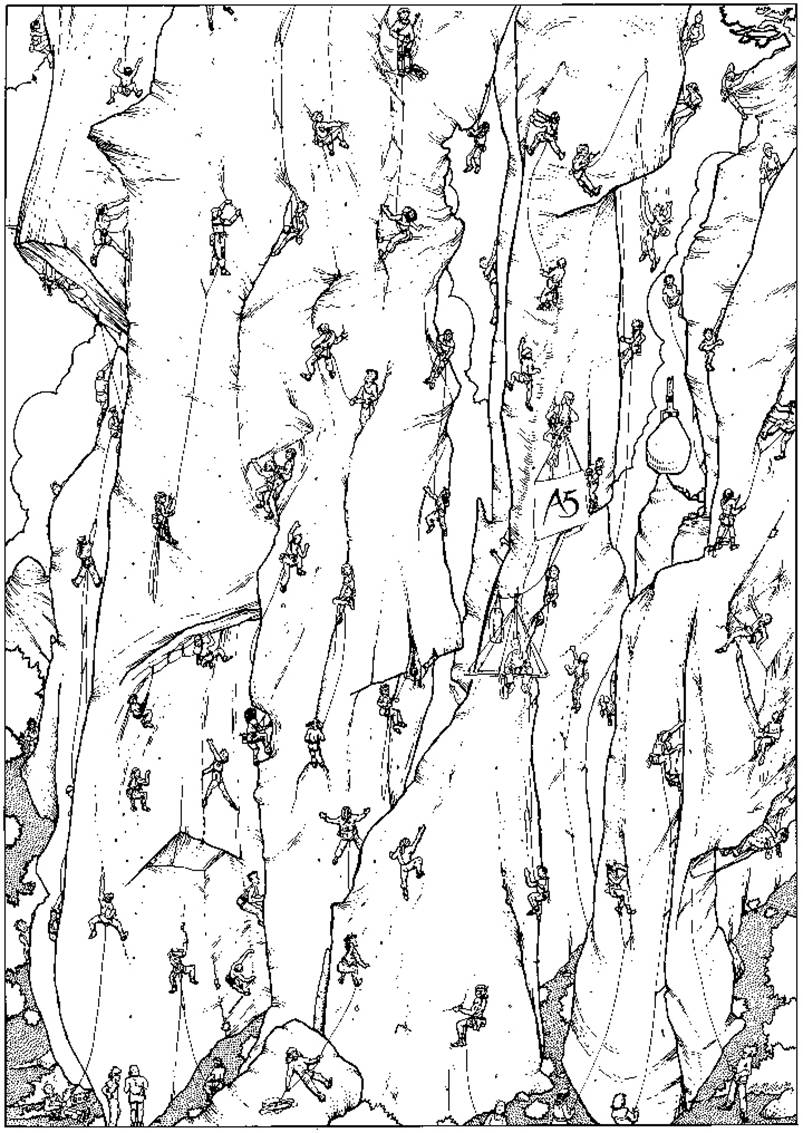
Big-wall climbs are guaranteed adventure. Climbing all day on technical rock for many successive days, dealing with a multitude of physical and mental challenges, setting up belays and bivouacs, and finally reaching the summit makes for an unforgettable experience. The unique state of mind achieved during multiple day big-wall ascents is so incredible that it is impossible to describe its essence on paper or otherwise; save it to say, however, that the motivations behind big wall climbs are more than just "because it is there"...
In this
manual, Section I discusses the gear required for big-wall ascents, Section II
describes some of the techniques, and Section III covers some miscellaneous
big-wall topics. Appendix One is about getting
started with aid climbing, and Appendix Two lists some recommended
This manual is not intended to be a guide for either beginner or expert. Rather, it is an attempt merely to review modern wall methods; many of the subjects covered will be a matter of opinion, of course, and no claim of absolute authority is made. It does, however, describe a workable wall system. It also assumes a basic knowledge of climbing: knots, placing protection, etc. Note: in most cases, the information assumes a nailing-wall, as opposed to a clean (i.e. hammerless) wall.
Part I: Gear and Personal Accoutrements
Hardware--Pitons
The
particular wall will determine the amount of hardware required. In
general, if the route has had more than ten ascents, the gear-lists given in
the Meyer's guide to
Large pitons can generally be cut down on, largely due to the advent of Friends. Other than on routes like Excaliber, where the wide-crack predominates, bongs are rarely needed. For most routes, three to five 1" pitons, two or three 1 1/4" pitons, one or two 1 1/2" pitons, and a bong (for luck) will generally suffice for the big stuff. This assumes a good selection of Friends: most commonly two or three sets up to #4, and perhaps an oversize (#5 or #7) for some routes (Wired Bliss's "Big Buds" are the best).
A couple of Leeper Z-pins are very handy to have on most routes. Although some people like to use them independently, Leepers can be stacked with an angle for a shallow or slightly oversize pin placement.
A wall
evolves with each successive ascent: pieces get fixed, placements become more
obvious and simple, loose rock gets removed (heh-heh),
etc. In general, walls become easier with use and the gear-lists change
accordingly. For specific information on
"When on the big stones, make sure you're tooled up to the gills." --Jim Gaun
Hooks
There are basically three types of hooks: (1) the Chouinard, (2) the Leeper Logan (flat and pointed), and (3) the ring-angle claw.
The Chouinard hook is the classic, most used hook; even the easiest nailing routes usually require at least two of them. As with all hooks, bring along extra because they're frequently dropped. For some routes (such as Zenyatta Mendatta), "pointed Chouinards" are necessary--this entails filing down the end of the hook into a sharp point (imagine a 45 degree triangular point). These hooks are used in enhanced hook placements--where a shallow 1/4" hole has been drilled in a horizontal or sloping shelf to allow the hook to "catch".
Leeper hooks are essential in some situations. The flat-Leepers are very stable and secure on certain narrow edges where a Chouinard would "rock" (very frightening). On thin low-angle slab climbing, a filed flat-Leeper (where half of the hooking edge is filed off) can be very useful. The pointed-Leepers also have a multitude of uses, most notably for bat-hooking; in fact, they work so well in 1/4" holes that it is hard to believe that they weren't designed for that purpose. Sometimes a slight tap sets the hook nicely while bat-hooking, but beware, if you pound them in, they are likely to spring out suddenly.
Ring-angle claws derive their name from the old style of these previously hard-to-find large hooks. Years ago, one would have to search desperately for a particular long, soft-iron, ring-angle piton and bend it into the proper shape (this took some practice, moreover). Professional models (such as the FishHook) are now available. These hooks are essential on some routes, their use ranging from hooking large, two-inch-thick detached flakes to hooking a large solid shelf. They are essentially an enlarged version of the regular hook. For some routes, several sizes may be required.
Copperheads
Copperheads
(or "mashheads") are specialty big-wall
items, which are mashed into shallow grooves or pockets as aid
placements. They are generally handmade, and
available from many sources (often available in the
Sizing:
#0 (tiny), #1 (small), #2 (about the diameter of a cigarette), #3 (medium), #4
and #5 (cowheads--up to 1/2" diameter).
The #0's have a cable that will just about hold a gymnast and aren't really
used much. For a given number of required heads, unless specified
otherwise, I would say a good proportion would be
Aluminum is often used for the larger heads (#3 and up); they are usually more secure (especially in softer rock) than their copper counterparts. They are not very durable, however; alumi-heads sometimes survive only one or two placements before they're rendered useless.

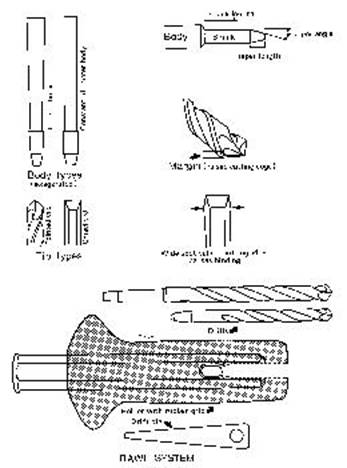
Bolting Gear
A small bolt-kit is nice to have for any route of medium or harder difficulty. Uses include replacing a bad belay bolt, setting a bivouac rivet, or drilling emergency anchors for retreating. A couple of 1/4" drills, drill holder, drift pin, and a few 1/4" bolts with hangers should be ample (note: some routes, such as Never-Never Land, have hangerless bolts at the belays--for these routes, bring five or six hangers). Also include some 1/4" coarse-thread nuts and a wrench for the occasional barren thread-head Rawldrive.
Rivets: 5/16" diameter, 3/4" long, coarse-thread, grade 5 machine bolts can be hammered securely in 1/4" holes [a #14 (slightly oversize 1/4") drill is perfect--otherwise some hammering or filing down of the rivet threads may be necessary].
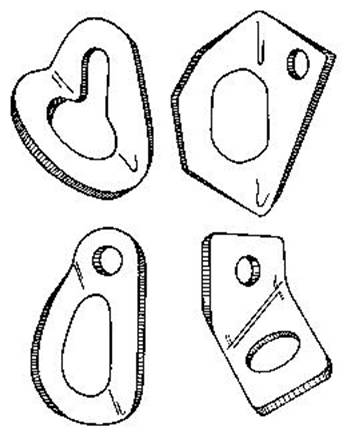
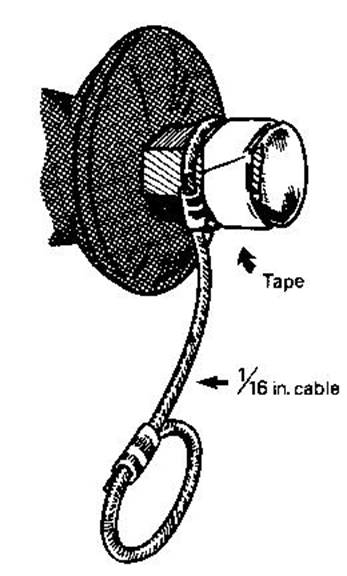
Rivet Hangers: Wired stoppers work well as rivet hangers. Simply push the nut down the cable and presto. One-half inch tie-off sling also works. For shorter length, specially-made rivet hangers can be fashioned out of a swaged wire loop (see diagram). Note: rumor has it that the Dawn Wall requires #1 thin-wired rivet hangers because the rivets are nearly flush with the wall.
Keyhole Hangers: Keyhole hangers can be fitted over a bolt-stud, such as a Rawl buttonhead. They can be made from any hanger (thick 3/8" SMC hangers work well) simply by filing a connecting slot from the carabiner hole to the bolt hole. Australian RP-type hangers work well as keyhole hangers for the larger head machine bolts.
Free 'Biners
Walls tend to use a lot of carabiners. It seems that one can start a pitch with a ton of free biners (those not used for racking purposes) and still run out, forcing him to "scarf" biners from other parts of the rack--there never seems to be enough. As a general guideline, a total of 80 carabiners should be considered a minimum for most nailing routes, some of the harder ones requiring up to 150 (i.e. when many placements have to be equalized, etc.).
Friends
Indispensable on walls. Probably the greatest energy-saving device for wall climbers ever invented. The ease of their placement and removal speeds things up considerably (impressive note: Mead Hargis and John Roskelley made a quick 2 1/2 day ascent of the N.A. Wall without Friends). As said before, two or three sets are nice to have on most walls, possibly more, depending on the nature of the wall and the amount of "leapfrogging" a climber is willing to do. Half-sizes are very handy, too. More than two #4's are rarely required.
Miscellaneous Hardware
A total of about thirty wired stoppers (and hexes) of various sizes, and at least two or three sets of Brass nuts (down to #0) is an adequate "wired" rack for most routes. Quickies are also very useful for aid-climbing (in fact, the Atlantic Ocean Wall requires a #2 Quickie). Wired Bliss TCU's, Lowe tri-cams, and HB nuts are good items in an arsenal, too. Walt Shipley swears by a set of hexes on every wall. In general, it is a good idea to have as great a variety of gear possible, since each type of gear may be the best (maybe even the only thing) for that certain placement.
Ropes
Needless to say, the lead-line should be in good shape. Walls tend to be harsh on ropes, especially while going over edges and being jumared on (a common occurrence). 11.5mm ropes are comforting. Haul lines are less critical--either a 9mm or an old 11mm can be used. Static line is most efficient for hauling: no stretch. A third line can have many uses (see Techniques).
Tie-offs
Depending on the wall, anywhere from ten to over a hundred tie-offs may be required (they tend to get trashed on some placements; for example, when tying off a piton in a corner). One-half inch tubular webbing is standard. Loops ranging from five to seven inches in diameter seem to be the most versatile (requiring about 24" of material each).
Runners
Many slings are required to keep rope-drag to a minimum. Also used to equalize belay anchors. 9/16" supertape slings tied a little shorter than regular length runners, and carried on a biner on the rack (instead of around the neck) are excellent runners. These can be doubled through the eye of a piton, thus saving a carabiner.
Fall Arrests
Surprisingly, Air Voyagers and the like haven't really caught on in wall-climbing as much as they deserve. I find them very reassuring on that relatively-secure-but somewhat-dubious piece in the midst of a long string of body-weight placements.
Pulleys
A good, efficient pulley is essential. The red or blue SARA rescue pulleys are very reliable. Ever since I dropped a pulley and had to haul the remainder of the wall through a carabiner (probably a thousand times the effort), I always bring a spare of some sort. New self camming hauling pulleys are now available, such as Rock Exotica's "Wall Hauler"; these are incredibly convenient devices eschewing the need to rig a jumar into each haul system.
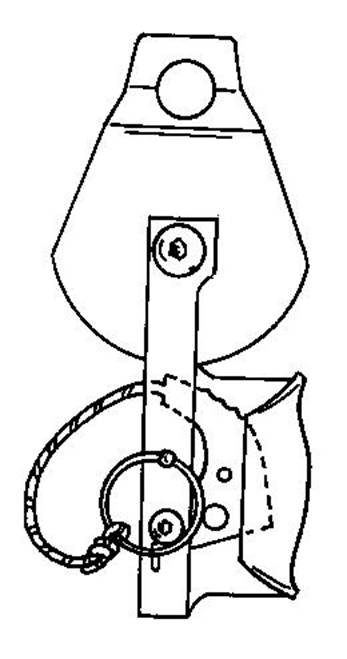
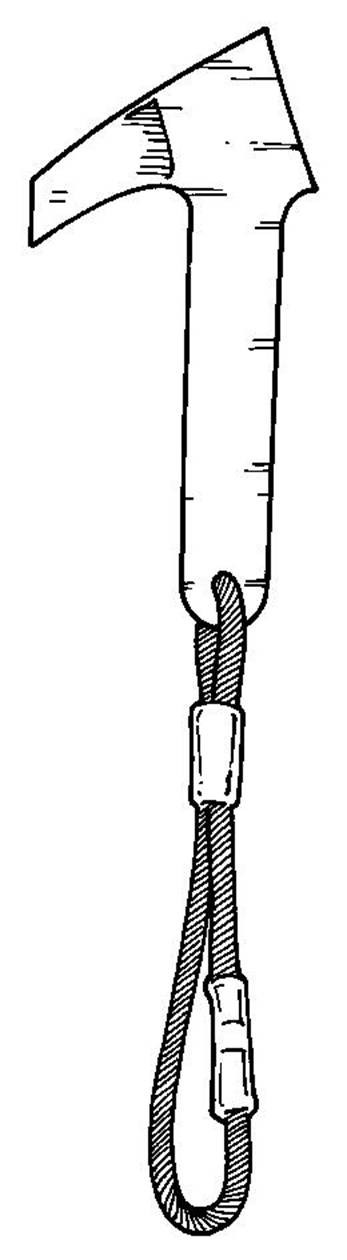
Hammers
An A5 hammer, with its hefty weight, copperheading pick, and carabiner hole is the recommended big-wall hammer.
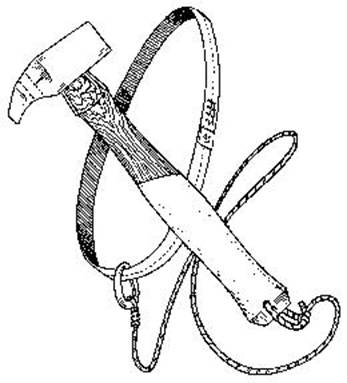
Hammer Holsters
A soft hammer holster is best because it doesn't dig into your flesh during belays and bivouacs.
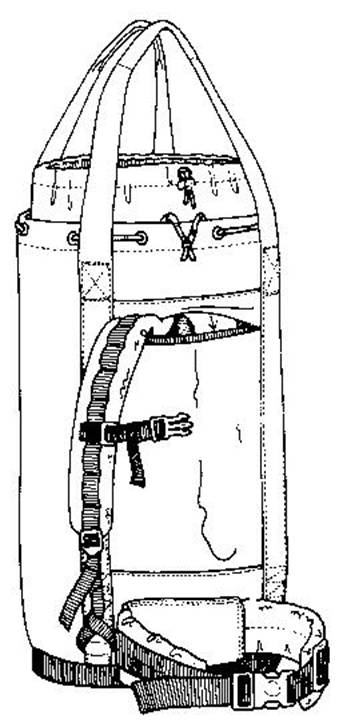
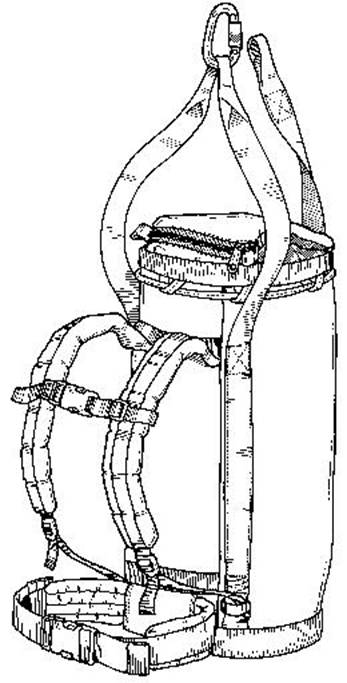
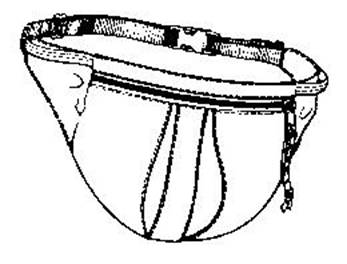
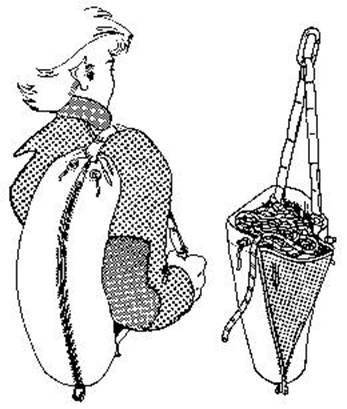
Haulbags
Many types are available. Make sure that the material is both tough and abrasion resistant (these do not always go hand-in-hand). Padded carrying straps are nice for the approaches. I've always found that the stout, wide haulbags were far easier to get in and out of (and pack) than the long, narrow ones.
Racking Slings
Without a doubt, the "double gear sling" is a great innovation for the heavier gear loads. No longer is the climber strangled by gear-slings crisscrossing his neck; instead, two padded slings sit on each shoulder connected in the back and front. The most versatile have two loops on each side (for maximum organization) and strong tie-in loops for clipping the entire rack in.
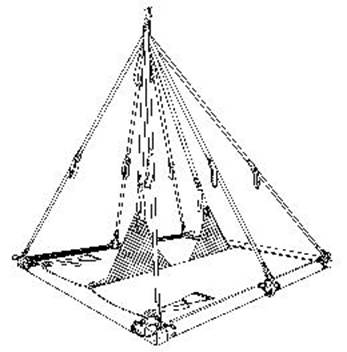
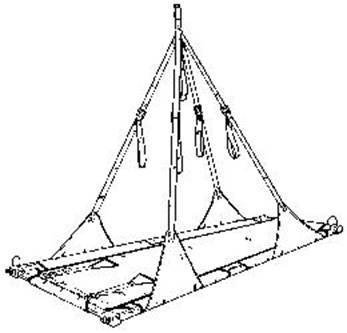
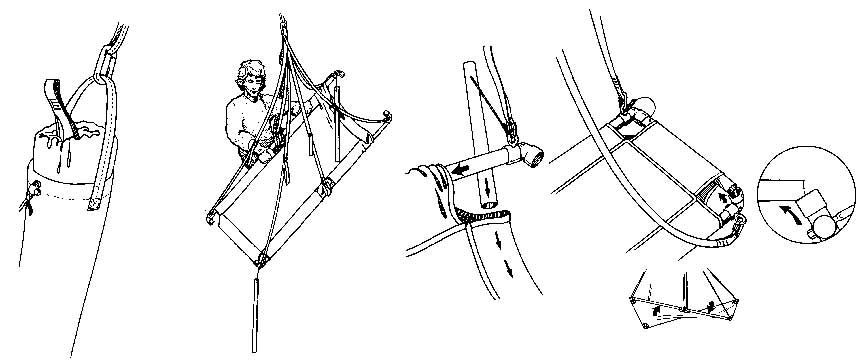
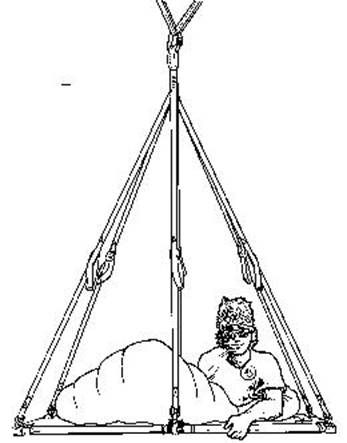
Porta-ledges
Many types of porta-ledges are on the market--some are excellent, some are poor. In order of importance, a good porta-ledge will be (1) stable while set up (i.e. does not tend to twist, "hourglass", or "parallelogram"--this usually requires rigid corner sections), (2) easy to adjust while in it (and beware, many of the adjusting systems slip, especially when wet, causing the entire ledge to twist out of shape), (3) easy to set up, (4) lightweight, and (5) roomy enough for lounging.
A good heavy-duty rainfly is essential; in general, always expect a storm and practice setting up the whole system hanging from a pull-up bar a few times (it'll be much worse if raining and windy).
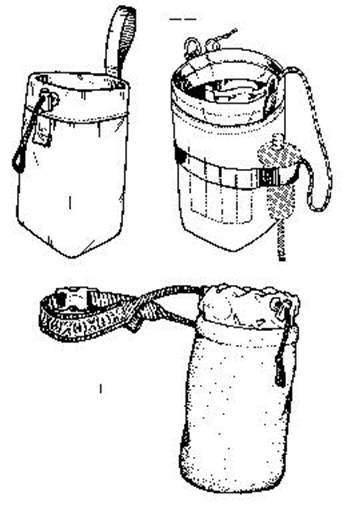
Water Bottles
Any
high-grade plastic jugs will work. They tend to get a lot of abuse while
in the haul-bag; any not up to par will make itself noticed as you helplessly
watch the wet-spot grow on the side of the haul-bag. I prefer the thick polypropelene gallon size (available from chemical supply
shops), duct-taped to the hilt (taping the tops on for the initial packing in
the haul-bag, too). Two-liter plastic soda bottles are great (they're
impossible to break, or even blow the top off--try it). Rinsing chemical
bottles with baking soda can diminish poisoning. Make sure to have a clip-in
loop on all water bottles. Fern Springs on the
Food
A matter of preference, of course. For a five-day wall, I would typically take five or six cans of dinners (lasagne, spagettios, beans, etc.), three or four cans of fruit, a box of Familia to mix in with the fruit (breakfast), four or five packages of bagels and cream cheese (not forgetting to grab a handful of those little packages of Grey Poupon mustards from the Deli), a couple packages of Fig Neutrons, and a selection of candy bars (make sure to get the sealed-wrapper type). Some hard candy (i.e. Jolly Rancher's) are also good to keep your mind off water while sitting at the belays.
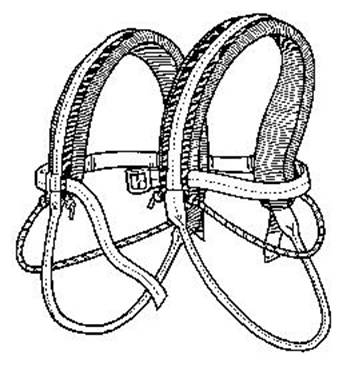
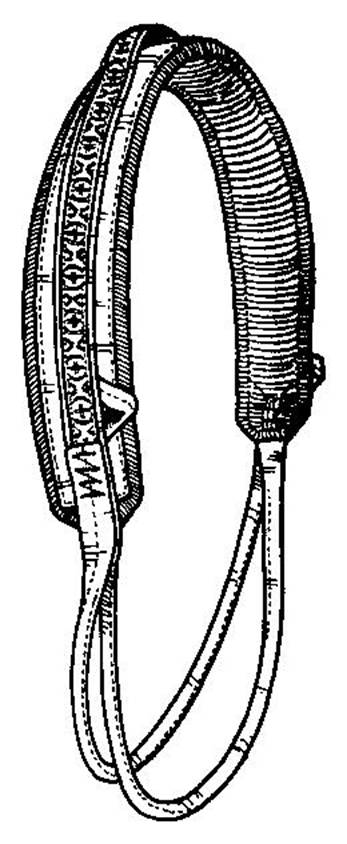
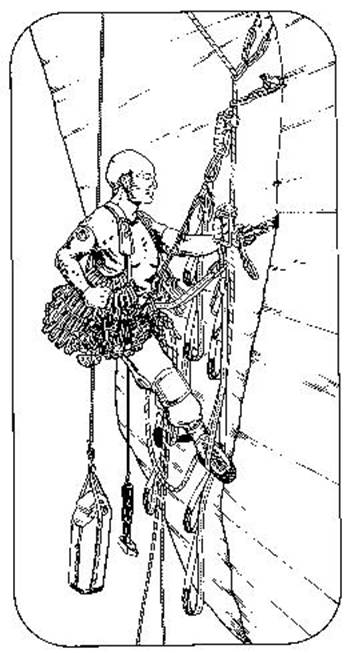
Harnesses
Since one hangs in a harness most of the day, a comfortable one is a luxury not to be done without (though John Barbellow has done multiple ten-day walls with merely a doubled two-inch swami and one-inch leg-loops). A wide waist harness (4-6") with gear loops, and well padded leg-loops make for a good harness. Don't forget a belay-seat of some sort.
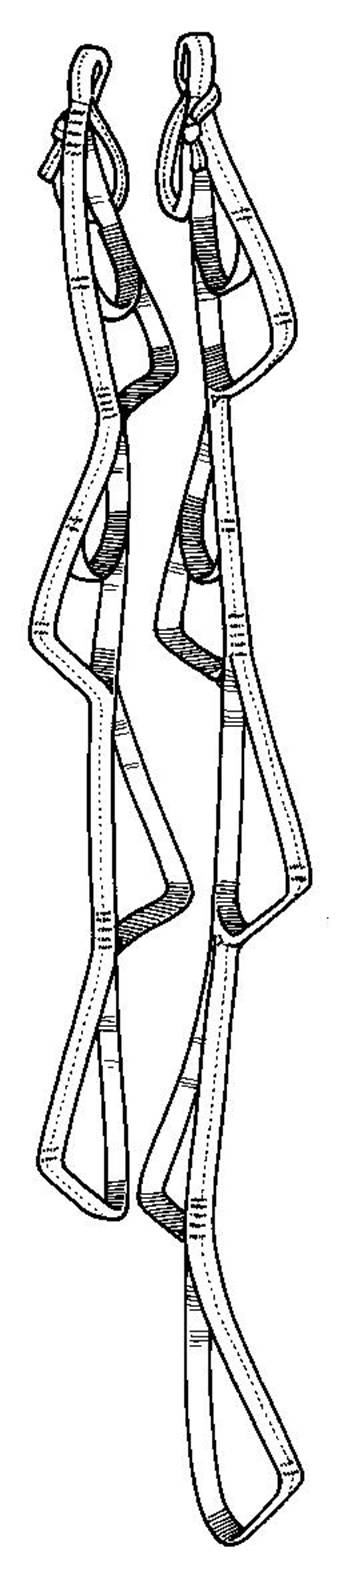
Aiders
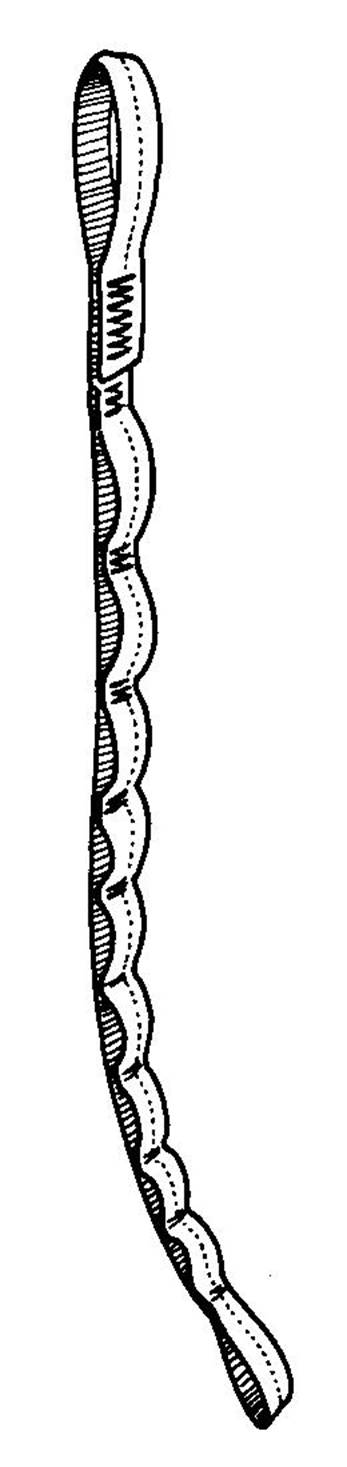
My favorite are the sewn, rigid-step, four-step aiders. Especially when its windy and the aiders spend half their time whipping around your head, it's nice to have a rigid opening to throw your foot into. I use four aiders--two on each biner. Aiders can also be knotted from one-inch webbing--these have the advantage of being custom designed (perfect sizing requires some experimentation).
Jumars
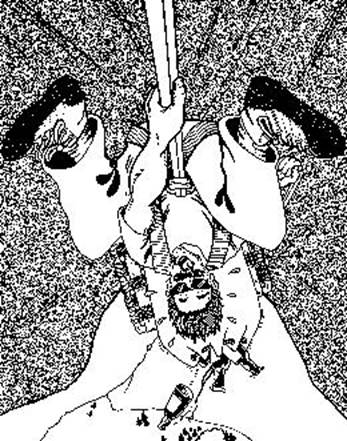
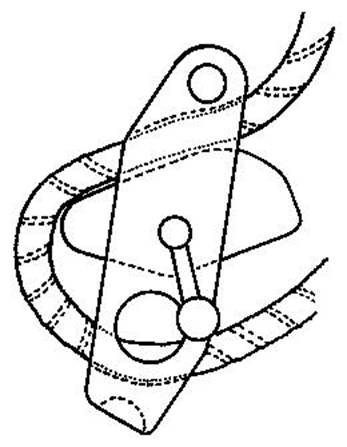
Three main types: Jumar, Clog, and CMI's. The CMI's are the strongest, but you need the fingers of Houdini to work the triggering mechanism. Jumars and Clogs are easier, and probably more comfortable, too. It's all a matter of preference. See diagram for rigging the Jumar-type jumars.

Headlamps
Essential for setting up that bivy in the dark. The preferred headlamp fits entirely on your head without a separate battery pack (besides getting caught on everything, the wires invariably have a built-in instinct to strangle). I've found Lithium to be unreliable. The best headlamp is the Petzl Zoom with the 4.5 volt flat (European-type) alkaline battery.
Shoes
Robbin's wall boots are still the standard (but unavailable). Any shoe can be used, but a wall will pretty much demolish most tennis shoes: a good lightweight hiking boot is preferred. The Nike Lava-domes are incredibly durable--I have a pair that's survived four walls--plus they have a semi-rigid sole for comfort in the slings. Resole with climbing rubber for the ultimate wall boot. A comfortable pair of free-climbing shoes for the occasional free-climbing section is a good option. Tie-in loops strung through an eyelet is convenient for clipping in your shoes at night--if you drop your only shoes, you can kiss your feet goodbye.
Kneepads
Nice to have--knees are constantly battered on walls.
Gloves
For protecting hands, gloves are a must (I only use them while cleaning a pitch). The thin, tight-fitting leather (goat-skin) gloves--with the fingers cut off above the first knuckle--are the best.
Sleeping Bag
Synthetic insulation. A clip-in loop sewed on is nice.
Rain Gear and Extra (warm) Clothing
"Check".
Miscellaneous
Stuff sacks are great for organizing food and bivy gear. Sew clip-in loops on. Also bring some cloth tape for gobis, a speedy stitcher for fabric repairs, perhaps some duct-tape for emergency repairs, aspirin for that morning hand cramp, and of course, a can opener (best: a swiss army knife) and the spoon. Don't forget the topo!
Part II: Techniques
Basic Systems
The basic wall system generally requires three ropes: a lead line (11mm or 11.5mm), a haul line (9mm to 11mm), and a lower-out line (9mm preferred--optional for many routes). Assume: Bert and Ernie on the "big stone".
1) Bert leads, Ernie belays.
2) Bert finishes pitch, sets up new belay, prepares to haul.
3) Ernie releases haulbag from his belay (if need be, lowering it out with the lower-out line), Bert hauls it.
4) Ernie cleans pitch (jumaring).
5) Ernie arrives at Bert's belay, prepares to lead.
6) Ernie leads, Bert belays.
Repeat until dark (bivy) or until topped out.
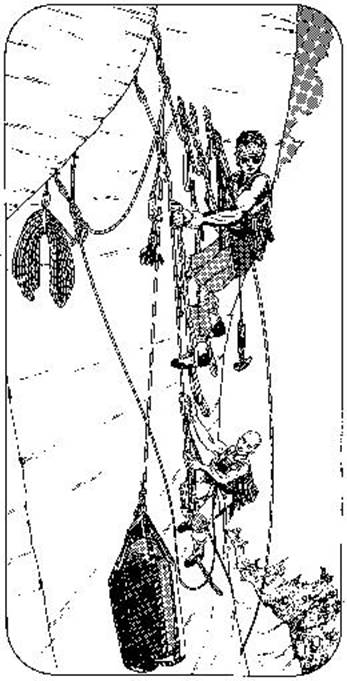
With three people, many systems are possible. After a pitch is led, one man will clean the pitch while the third man jumars a free-hanging rope (either before or after the bag is hauled, depending on system used). It is usually most efficient to have the person who jumared the free-hanging rope start to lead the next pitch while the previous pitch is still being cleaned (this may require a slightly larger rack; more gear can be sent up to the leader, however, after it is cleaned).
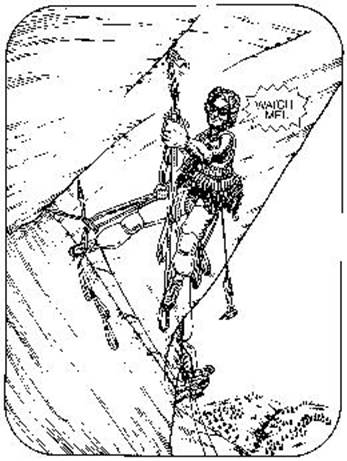
Leading: General Techniques
Cleverness is an asset on walls; good judgement and innovative thinking are in constant demand up there. Besides the main challenge of a successful ascent, a wall offers a continual set of minor challenges, each one unique, and each one requiring a slightly different solution. With experience, one learns the "tricks of the trade" (mostly through trial and error) and the complex task of wall climbing becomes more second nature. One develops an eye for a placement, an innate ability to deal with multiple ropes, slings, aiders, pins, biners, etc., and an awareness of the interrelationship among the climbing gear, the stone, and upward progress.
While preparing for a nailing lead, it is a good idea to first look at the line and mentally calculate a general plan, i.e. how slings will be running so as to minimize rope drag, or how, for example, some of a certain size piton should be saved for a latter section. Don't ever trust the topo, as it is merely a general guideline and by no means exact. Overall efficiency becomes the name of the game, and accurate judgement is required.
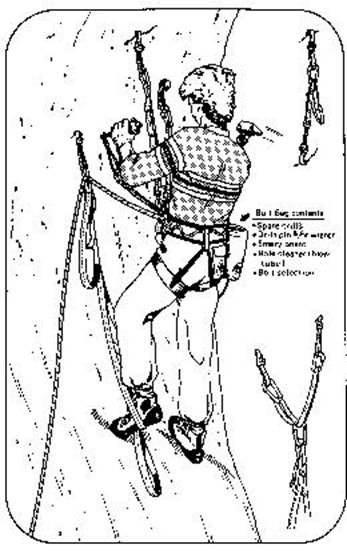
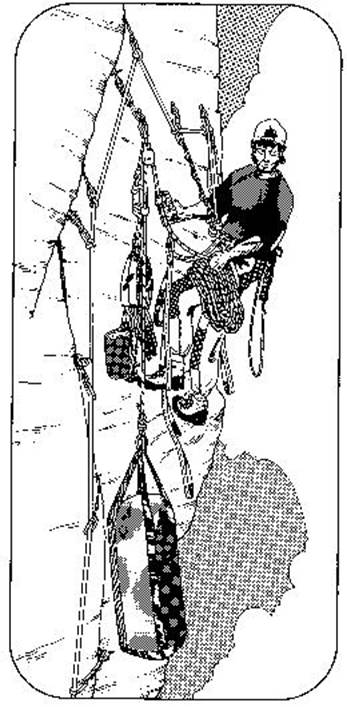
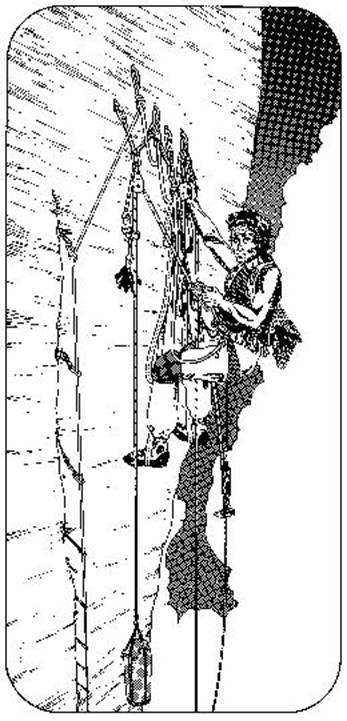
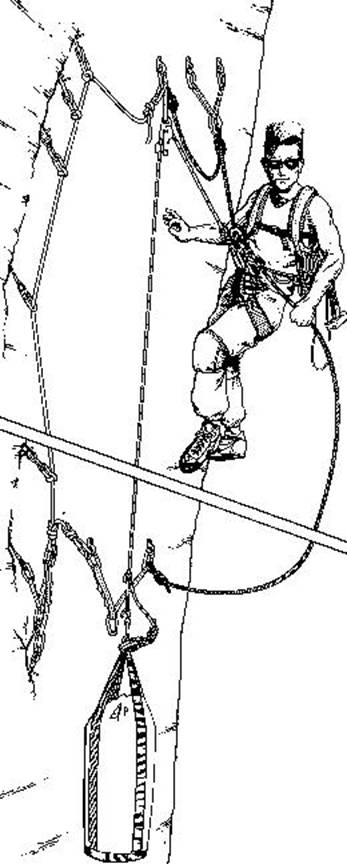
Gear: Proper organization of gear while preparing a lead is all important. With double gear slings, racking has become both simple and comfortable. An idea: rack pins (5 to 6 knifeblades per biner, 4 to 5 Lost Arrows per biner, 3 to 4 baby angles per biner, and 2 to 3 angles per biner), slings, and tie-offs on the right side; Friends, wired stoppers, copperheads, and hooks on the left side; and then distribute the free biners so as to equalize the weight on each side. However it is done, quick access requires a consistent, familiar system.
Sling use: Slings reduce rope drag, save biners, prevent the rope from going over sharp edges, and equalize belay anchors. Carrying slings on carabiners on the rack (instead of around the shoulder) is quite convenient as it keeps them out-of-the-way and yet fairly accessible. 20 or 30 medium length 9/16" (supertape) slings, and 10 to 15 full-length 1" slings should be ample for most routes. Be aware of sharp edges while on lead, both for yourself and for your partner (who will be jumaring on those edges); slings usually solve this problem, but infrequently an edge will be so bad that an article of clothing must be shed and left securely in place to pad it. At belays, it's a good practice to equalize anchors with regular length 1" slings. Proper equalization distributes the load equally between two anchors, and is secure even if one of the two anchors fail.
Tie-off use: Tie-offs (short loops of 1/2" tubular webbing) reduce the leverage on pitons which "bottom out". An overhand knot can be used to tie pitons off, but a clove hitch can be quicker and a lot easier to untie afterwards. A longer "keeper sling" tie-off looped through the eye and clipped in will prevent losing the pin if it pulls out (make sure the load is not on the keeper sling).
Aiders: Two sets of aiders are handy (2 aiders on each biner). It's nice to have a "grab loop" and a sub-second step (drawing). For testing purposes, one of the two aiders should be longer (5-step).
Daisys: A daisy chain acts as a secure tentacle--a cord and biner directly connecting the climber to a placement. Five millimeter perlon works well (doubled), knotted every foot or so and extending from one's harness to the tip of his/her reach. For the harder routes, two separate daisys are useful (different colors). Also, I'll usually have a fifi hook on a short supertape sling (proper adjustment necessary) tied directly to my harness. The usual procedure: a) place the next piece, b) clip in a set of aiders, c) clip in the daisy, d) test the piece, e) get on it, climb into the third step of the aiders, hook in the fifi and hang from it (note: a carabiner can take the place of a fifi, but the fifi is easier to hook in). After a momentary reprieve, decide what's required for the next placement, probably climb up the aiders some more (the daisy, clipped in short, can also be used on overhanging sections to lever in the topstepping climber), and repeat. With the daisy, the rope doesn't need to be clipped into a piece until one is ready to move off it (simplifying things and minimizing the potential length of fall).
Testing: There are two methods of moving onto dubious placements: (1) the "ease-onto-it" method, whereby the climber slowly eases his weight off the present piece and onto the next piece, hoping it will hold full body weight, and (2) the more recommended shock-test method, whereby the climber bounces his weight on the next piece (with the aiders and daisy clipped in--not the rope) slowly at first and gradually building up to forces exceeding body weight. Of major importance, of course, is preventing the present piece from getting shock-loaded if the tested piece does pull (requires care). Properly done, however, most placements can be tested to handle a small shock load. Of course, sometimes a dubious piece can't or shouldn't be tested, or can only be mini-tested (long sideways placements, some roof placements, fragile hook placements); judgement is required. Testing in the midst of a string of dicey placements can be one of the scariest parts of wall climbing.
Free-climbing: Sometimes a leader is required to free-climb a section after aiding. To leave the security of the aiders is usually exciting, especially when the aiders must be retrieved for future use. Then the main difficulty is to keep from tripping over the aiders and the daisy (clip out of the way).
Cheater
sticks: Though some consider cheater sticks unethical (?), it's all part
of the game if their use is desired. Personally, I never use one because
it's just an extraneous piece of gear which gets in the way and is seldom used.
Some of the newer routes (such as Lost in
Belay set-ups: Once the belay is reached, it is important to keep organized, as things become increasingly complex. As belays are set up, keep in mind where your partner will be coming up, where the hauling will be done from, and where you'll be hanging from while your partner leads the next pitch. When the anchors are spread out, belay set-ups are simple, but when the anchors are bunched together, proper set-up can be tricky. Make sure to tie in with enough slack to be able to haul. I'll usually tie in with quite a few feet of slack, and then hang from a jumar attached to the anchored rope and clipped directly into my harness. I'll use this same jumar to haul with, then later clip my butt-bag(belay seat) to the jumar and hang from that (making things adjustable). Clipping the daisy into part of the belay will act as a back-up. While belaying, a jumar can be used as a third hand for holding the belay rope.
Having a rigid porta-ledge set-up makes for luxurious belays. Or, a comfortable seat can be fashioned out of a two-foot square piece of plywood (padded) with two holes drilled in the corners of one side, and one hole drilled in the center of the other side. Rig with slings (center sling should be adjustable).
Leading: Specific Techniques
Copperheading: Intricate copperheading is an art, learned through experience. A tool is frequently needed for the smaller heads (for larger copper-(or alumi-)heads, the pointed end of the hammer is often effective). Lost Arrows work okay for placing copperheads; personally, I use a blunted 5/8" chisel (never for enhancement) tied to a long sling. For most placements, the old "X-em, paste-em, rock-em, sniff-em" technique is adequate [X-em: embed the head with multiple cross-hatched blows; paste-em: pin the right and left side in; rock-em: hit the top and bottom and watch to see if it "rocks"; and finally, sniff-em, and "if it stinks, get off it!"]. To remove, connect a sling from the copperhead to the hammer (having a hole in the hammer head simplifies this), and swing upwards, jerking it out. For some heads, a biner-chain instead of a sling may be required; it's a considerate practice, however, to leave a copperhead fixed in place if it looks like the wire will rip out, otherwise, an unsightly blob of metal would remain in possibly the only spot (and must later be tediously cleaned out by the next party).
Hooking: A familiarity of the various hook types and a knowledge of where each will be best is essential. Practice on the boulders (preferably not the chalked ones) to get a feeling for hooks. When hooking, always keep a daisy connected to the hook/aider so it doesn't blow away or become lost in case of a fall.
Expando: In expanding cracks and flakes, placing a successive piece may loosen the piece that one's on--always clip into the higher piece with a daisy. Overdriving a piton at the start of an expanding section will often make the section more secure (though it could blow the flake apart). Intelligent use of pitons, nuts and Friends reduces expando from its voodoo reputation to a fairly sane activity; it's necessary to "read" the crack and make judgements accordingly.
Expanding copperheading is always exciting: when a flake is too loose or too thin to be nailed, tapping copperheads deep into the flake and weighting them until they (hopefully) catch is the technique. The copperheads act as stoppers, being held in mostly by the pressure of the flake.
Stacked pins: Pitons sometimes need to be stacked when additional tension for a placement is needed. Blades and arrows can be stacked, angles and Leeper Z-pins are commonly stacked, and large angles can be stacked with each other for placement in a large shallow hole. Tying a "keeper sling" (regular tie-off) through the eyes of the tied-off stacked pins minimizes the chance of losing them if they pull out.
Other placements: As one develops an eye for a placement, the best selection can be made from the arsenal of possibilities. Two-cammed Friends are often secure. Brass nuts are frequently bomber in the bottom of pin scars. Bongs can be used sideways for large cracks. Placement possibilities are often endless for a given section of rock; good judgement will be helpful in choosing the most secure, most efficient placement. Finally, overdriving pitons past the point where they're obviously bomber makes them very hard to remove and is usually unnecessary (it's that "one last hit" which transforms a pin from "bomber" to "fixed"). Also, avoid placements such as directly below a small roof where the pin will be uncleanable (resulting in a "geometrically fixed pin").
Cleaning
Efficiency while cleaning is a must. Keeping removed gear organized while cleaning a pitch makes re-racking for the next pitch simple. For cleaning purposes, I usually sacrifice a biner (large Bonnatti D's last the longest) which I tape onto a cleaning sling. Clipping the cleaning biner into a to-be-cleaned piton prevents the piton from being dropped, and allows some leverage to be applied. Also, having a "Long Dong" (long Lost Arrow) accessible on a long sling speeds the cleaning of stuck nuts.
Cleaning pendulums: the simplest, quickest way to clean short pendulums (long ones must be rappelled) is to make a bight (loop) with the end that one's tied in with, pass it through the pendulum point sling, clip the bight into a biner in the harness, pull the slack out of the bight so the weight is on the bight and off the jumars, unclip the pendulum point biner, and lower out (only one hand necessary). The rope will pull through the pendulum point sling after lowering (unclip bight from harness and pull through).
If it is desired to keep the pendulum point piece (otherwise it must be left fixed), the sporty method involves hanging from the cleaning biner (clipped from harness to pendulum point), and hammering away at the pendulum point piece until it pulls--a sudden swing ensues.
Transitions
Making the transition from cleaning a pitch to leading the next pitch can be one of the more awkward times on the wall, especially when the belay is cramped. A well set up belay, with anchors spread out as much as possible, makes transitions simpler. Efficiency is key while getting the gear re-racked, obtaining an untangled belay from your partner, and making the first few placements off the belay anchor. Don't forget the haul line!
Ropes and Management
The "spaghetti management system" where everything is left to hang and tangle at will is not recommended. Instead , careful organization and separation of the various ropes will save time and energy in the long run. Different colored ropes allow for quick identification. Stacking a rope through a sling keeps it from blowing around and getting tangled; stacking the lead line and the haul line , and letting the lower-out line hang (single strand) is usually acceptable unless it's really windy, then all ropes should be stacked. If the haul line is left to hang, however, it 's generally nice to clip it loosely to the belay with a Munter hitch so that the leader doesn't have to deal with the full weight of the haul rope (give slack as needed).
Sometimes the leader will need additional gear sent up from the belay while leading a pitch; he'll haul it up on the free-hanging haul line. This is no problem if less than half the rope is out, but if more than half is out, then the haul line will have to be untied from the haul bags, and the lower-out line attached (pain-in-the-arse). Two solutions : 1) when leading, make sure that you have everything needed to finish the pitch as you near the half-rope point , or 2) utilize a "zip line" (requires fourth rope). On the harder routes, I'll trail a 7mm "zip line" instead of a haul line. Besides being lighter, gear can be sent up easily at any point on the pitch. At the end of the pitch, the zip line is then used to pull the haul line up.
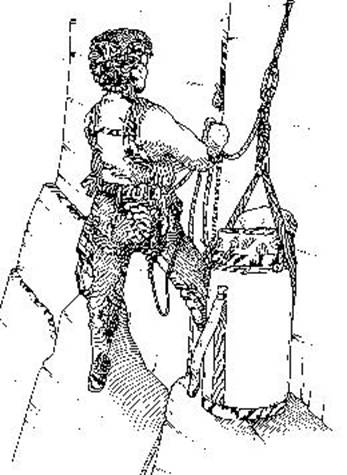
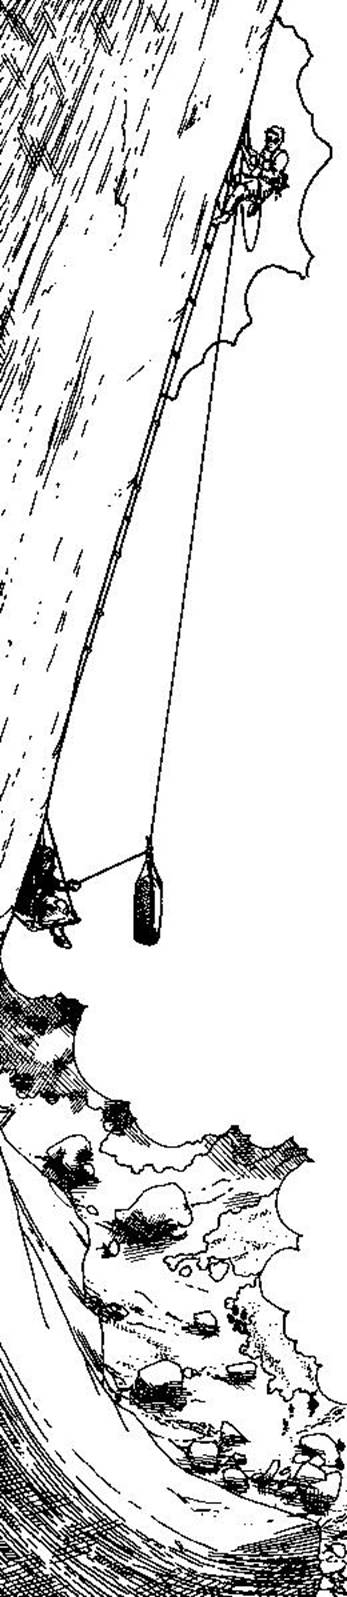
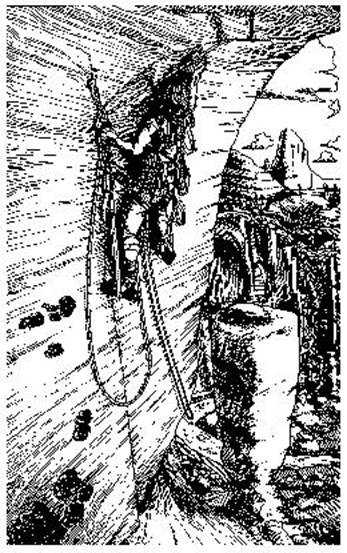
Hauling
Hauling the bags can be one of the more strenuous activities on the wall. Once the leader is set-up to haul (pulley, upside-down retaining jumar, hauling jumar clipped to harness) the belayer must free the bags from his anchor. On straight-up pitches this is straightforward, but on traversing pitches, it's often difficult. Assuming the bags are too heavy to lift by hand, the simplest method is to clip the lower-out line (tied into the haul bags) through a higher anchor, and mini-haul them (with a belay device and/or jumar attached to waist) until their weight is off their anchor. Then, unclip the bags from the anchor and lower them out; the leader/hauler then takes over. For huge 200-plus pound loads, two separate hauls can be made; simpler, however, is the two-man haul system: the cleaner somehow gets the bags off the anchor (with help from the leader/hauler), then cleans the pitch. He'll then act as a "dead weight" clipped on with his jumars to the other end of the haul line while the leader hauls in the traditional manner.
Clipping the haulbags into the anchor entails (1) clipping the haulbag daisy (a sling directly connected to the haulbag(s)) into the anchor, (2) lowering the haulbags (reverse hauling) until their weight is no longer on the haul line, (3) disassembling the haul system so that the pulley can be removed and readied for the next lead, and (4) clipping in the haul rope short into the anchor as a direct back-up to the daisy.
Haul bags getting caught on things during the haul is standard on walls; both the hauler and the cleaner should be aware of possible snags and be ready to deal with them.
Organization of the haul bag: Make sure water bottles, especially on lower angle routes, are well padded (ensolite). Certain items need to be handy (extra rack, some food and water for during the day, possibly the rain gear) so pack accordingly. Having either a day-pack accessible or a pocket in the top of the haul bag makes organization simpler.
Fixing
Fixing the first few pitches on walls is standard practice; without making the full commitment, the initial work can be done on the wall. Fixing station-to-station is advised if possible, otherwise, ropes can be tied together and left to hang. Leaving gear on the wall lessens the eventual work load, but watch for gear thieves (the lowest form of life). Actually, this hasn't been too bad a problem in recent years, since getting caught could (should) be fatal.
Hauling past knots is tricky, usually requiring either hauling temporarily through a carabiner, or lowering the hauling anchor. Rappelling past knots requires use of the jumars.
Jumaring: always be tied into the jumars (daisys) while jumaring.
Free-hanging jumaring can be made less strenuous with
the "
Bivys
Bivouacs are often the most pleasant time on walls. Stuff sacks (food) and sleeping bags with sewn tie loops can simplify bivy set-up. Be sure to have practiced setting up your porta-ledge before you're actually on the wall, it's more difficult to set up while hanging on the route. Occasionally, if a bivy is too cramped, I'll set a bivy rivet to spread things out a little more (the only time I'll ever drill on an existing route); it is rarely necessary, however, on the trade routes.
Retreating
Retreating is difficult on the steeper routes, usually requiring down-nailing. It's always a good idea to keep in mind a general plan for emergencies. Weather is a major cause of trouble on walls; proper storm gear, even in the warmer seasons will often prevent a sudden change in plans due to a sudden change of weather. Self-rescue is the preferred escape; calling for a rescue should be avoided unless absolutely necessary-- keep in mind that a rescue is never a simple task.
Bag Throwing
The NPS recently has semi-illegalized bag-throwing; if caught throwing haul bags off the top of a wall, you'll be charged with "creating a hazardous situation". Thus, don't do it unless you've a real need. If you do decide to throw bags, you can either throw a bag with only soft stuff (sleeping bags, clothes, slings, etc.), or throw heavy stuff rigged with a parachute-- parachutes can be fashioned out of aiders (as parachute cords) and porta-ledge rainflys (as the parachute). Never throw anything breakable (no cans, porta-ledges, Friends, biners), and tie hardware (pitons) together with a sling and pad with ensolite and sleeping bags. Heavy stuff will go near the bottom. Pack a sleeping bag at the top and tie the haul bag's opening loosely--the sleeping bag will blow out the top of the haulbag at impact, absorbing a lot of the shock (otherwise the haulbag will probably blow apart). Throwing bags is not really recommended, as hitting someone at the base would certainly be lethal.
Shit and Garbage
People disagree about these subjects. If there's no one below you on the route, I recommend taking dumps out in space, since paper bags full of shit at the base of routes definitely last a while and are very unsightly. Trash (cans, wrappers, etc.), however, should be carried up, since throwing garbage off routes can be considered nothing less than littering, even if you plan to return to pick it up. El Cap and Half Dome are getting so much use that their bases are becoming pig-stys, and the trash is no longer an interesting curio of an ascent; thus, though it's fairly inconvenient, we're just going to have to be more responsible , and carry our trash up.

"It ain't over 'til it's over" Yogi Berra
Part III: Miscellaneous Topics
Attitude
Big-wall climbing in Yosemite is a sport in itself--an adventure requiring specialized gear, specialized techniques, and above all, a specialized state of mind. In fact, the state of mind required for a multi-day big-wall ascent is so unique that many are unable to "click into it", and thus the initial failure rate by far exceeds the initial success rate. Commonly, a climber's natural impulse, once on the wall, is to immediately want to go down (intimidation, sudden lack of motivation); if the mind succumbs to this impulse, it then rationalizes reasons for not being there. Consequently, many parties retreat without any specific reason to (but with stacks of general ones: i.e. weather looked poor, not enough H20, etc.). Generally, if its possible to push through the first day or two of indecision, the rest is easy.
A determined and positive attitude is required for a successful big-wall ascent; dispassionate or negative attitudes guarantee failure. Big-wall climbing seems to require three basic mental talents: 1) Concentration and awareness: the ability to "keep it together" for long periods of time, combined with forethought and a fine-tuned awareness of the environment (gear, rock, weather, partner, etc.); 2) Commitment: commitment towards achieving a goal, and a willingness to repeatedly make an effort, and deal with hardships positively; and 3) Communication: working effectively and efficiently with partners. The mental aspect of big-wall climbing can be just as challenging as the physical aspect.
Solo Techniques
Soloing a wall can be a great experience. With a busy work load, a high degree of commitment and uncertainty, and an intense amount of solitude (being merely thousands of feet from civilization and yet so alone), solo wall climbing becomes a unique adventure, potentially testing the climber to his/her physical and mental limits.
Techniques are generally the same as with a partner, except that a self-contained belay system is required. For pure or mostly aid routes, the clove-hitch system works well. The climber simply ties a clove hitch in the lead line and clips it into a locking pearbiner on the harness. One end of the lead line is anchored into the belay (must be good for upward pull), and the other end can be left to hang (or tied in and/or backed up--tied in short to the climber--depending on to what degree the system is trusted. [Letting the lead line hang single strand, however, prevents a loop from getting hung up on flakes.] Slack must be passed through the clove hitch as each move is made. Having two pearbiners allows large amounts of slack to be had (for free-climbing) while still always being tied in: tie a second clove hitch in the second pearbiner with the required amount of slack, then untie the first clove hitch. Note: new mechanical devices now available greatly increase efficiency and ease of use with solo self-belay systems. Rock Exotica's new "Solo-aid" device is essentially a mechanical version of the clove hitch, yet is a lot easier to use than a clove hitch, and is just as strong and secure.
One advantage to soloing is that rope drag is never a problem (the rope remains fixed in relation to the pieces); in fact, the rope can be tied into bomber pieces anywhere on the pitch. Leading and following pendulums is more difficult on the solo, requiring the use of jumars and/or a rappel device. Of major importance is setting up the haul line properly before a pitch gets led so that it doesn't snag while leading.
Once a lead is finished, the pitch must be rappelled and cleaned, and the bag hauled. A standard system entails rapping down the haul line (setting up the haul system before rappelling--third jumar required), freeing the haul bag, cleaning the pitch, hauling, and setting up to lead the next pitch. Getting back to the previous belay can be difficult if the pitch traverses considerably; infrequently two ropes must be tied together (must be set up before leading the pitch). One rope is then rappelled and the next jumared to the previous belay; the latter rope is then pulled back into the belay and used to lower out the haul bag. Generally, however, it is possible to simply rappel down on one rope and pull oneself (possibly with the jumars) back into the previous belay.
For straight-up pitches, the rappel/body haul system (the "sporty" system) can be used: two ropes are trailed in addition to the lead line: the haul line and a rappel line. The haul bag is left solely on a fifi hook (must be rigged properly so that an upward pull on the haul line will lift if off the anchor); the haul bag is then body-hauled as the pitch is rappelled (set up haul system carefully so that no snags develop). Though huge amounts of energy are saved, this system can be dangerous unless everything is set up exactly right; of major importance is to leave the haul bag on a remote part of the anchor so that a fall while leading would not disrupt the haul bag's anchor, possibly causing it to fall (disaster).
First Ascents
During an ascent of the Pacific Ocean Wall, my partner Werner Braun commented on how the P.O. was the first wall to "cross the line into the absurd." The "line," apparently being somewhere between the climbing of a long, obvious, soaring crack system, and the climbing of a nebulous series of connected flakes and cracks. But with all the inspiring obvious lines on El Cap now conquered and immortalized by the first ascentionists with names like The Heart Route, Magic Mushroom, Mescalito, Dihedral, Salathe, and Aquarian Wall, one can no longer sit in El Cap Meadow, spot the new, unclimbed line with the naked eye. Instead, binoculars and telescopes (such as the Celestron C-90) have become standard equipment, and the definition of a climbable line becomes redefined. The desire to pioneer new routes has continued, only with a finer sense of what can and cannot be done (this includes a sense of what is a reasonable number of drilled holes). Man's desire to climb where no man has climbed before (pardon the cliche) does not diminish with the fewer unclimbed obvious lines; rather, it remains as great as ever, only the gear, techniques, and attitudes change.
First ascents generally require extensive planning prior to the ascent itself. Prior planning includes making a topo of the area to be climbed drawn from a telescope mapping out potential features and alternative features, and determining the gear to be taken up. Generally, lots of extra gear needs to be included to account for the unknown climbing which will be encountered. The "unknown", the prerequisite to adventure, is in abundant supply on first ascents.
Ethics
Wall ethics do exist, though generally not as universally controversial as free-climbing ethics. Climbing is a game with certain non-absolute rules; though a lot of climbers pretend to ignore their existence and refuse to acknowledge specific rules, everyone seems to draw the line somewhere. With walls, good ethics come from having a reverent respect for the rock. Minimum impact becomes the name of the game. For first ascents, this involves minimum bolting and riveting (never drilling unless absolutely no natural placement is available), and minimum rock sculpting (poor style in any case). For subsequent ascents, basically any altering of the rock (besides the non-avoidable crack damage of placing and removing pins) is considered poor style. This includes drilling on lead (if you're drilling bolts where others didn't need them, you're probably out of your league), chiselling the rock for better placements, etc. But enough said about this grey subject...
Wall Climbing Styles
Wall
climbing has a tradition of pioneers who have utilized the best of their
present technologies, developed new specialized tools, and brought into
existence novel and strange techniques in order to ascend previously
unreasonable expanses of rock. When the ascetic hardmen
Salath? and Nelson first climbed the Lost Arrow
Chimney over a period of five days in 1947, they made a radical departure from
the traditional rock climbing style then prevalent in
Presently, wall climbing seems to have found some equilibrium, with the present game being to find those last great routes, and to climb them in as perfect style as possible (minimum bolting and rock sculpting). Most of the activity is still concentrated on the two "big stones" (El Cap & Half Dome), yet certain individuals like Steve Bosque, Mike Corbett, and Ken Yager have been active in finding good wall routes off the beaten path. Other present-day games include speed climbing (both of clean routes like the Nose, and nailing routes like the Shield), all-clean climbing of previously nailed routes, and no-bolt first ascents (such as Bob-the-aid-man's "Time Machine" near Glacier Point).
The future will probably bring new variations and refinements on these present day games, with new technology (synthetic pitons, new micro-gear) being influential.
Grades
One characteristic of adventurous things is that precise difficulty cannot be adequately defined. Though one is certain in his/her own mind of the "challenges unknown" encountered and overcome, they usually can't even be described, let alone numbered. Big wall grades of A5+ or harder probably impress the masses, but anyone who knows better will tell you that ultra-specific wall grades need to be taken with a few grains of salt, due to the incredible diversity of the difficulties involved with wall climbing (especially the hard routes). An A5 lead on the Atlantic Ocean Wall, besides taking seven hours and being the most exhausting thing--both mentally and physically--I've ever done (including, for example, the Nose-in-a-day), had a dangerous fall potential starting from about a third the way up (looking at hitting a slab) and continuing up on marginal pieces--many barely body weight and none very secure--most of the way. A5 pitches on other routes, though completely different, are given the A5 grade because they are top difficulty on an arbitrary scale; granted, A5 pitches vary in difficulty, but making a precise distinction is elusory.
Historically, the A5 grade has always been the most difficult thing going; what they called A5 on the original North American Wall ascent, for example, would be considered A2 or A3 by present new-wave standards; likewise, A5 on the original Pacific Ocean Wall ascent would be considered relatively tame (probably A3 or minimal A4: a reasonably safe 60-80 foot fall) by today's standards. [Note: this is all beside the fact that these routes have become easier with use.] Presently, new-wave A5 means a dangerous or death fall potential on marginal body weight placements. Aid climbing just becomes more bold with time; to let the scale get out of control with grades of A6 and up simply renders the grade system useless, being dependent on people's egos rather than the nature of the route. Besides, a route with many easy pitches and one so-called A5+ pitch will not necessarily be harder than a route with continuous A5 pitches. Conclusion: since it is so sketchy to put a number on something so massive and diverse as a big-wall, it seems reasonable to stick with the basic A1-A5 system for describing individual pitches; those experienced in hard aid climbing will intuitively know what is involved anyway. [*Note: the recently developed MBWRS (Mayfield/Bridwell Wall Rating System) with its grades like NTB (not-too-bad) and PDH (pretty damn hard) is functionally descriptive, too.]
Here's an attempt to describe A5: To describe A5 is to describe fear. Though I've only been there a few times myself, A5 is commonly defined as looking at a serious fall on marginal protection. But it's more than a moment, it's a span of time. Climbing from sketchy placement to tricky placement to sketchy and tricky placement, ever removed from anything secure, farther and farther from the point of no return (and miles away from any upcoming security), testing subsequent placements less and less for fear of any sudden motion, panic and fear (fumbler generators) barely held in control, finally stepping on an untested tied-off knifeblade because the present hook placement just crumbled into nothingness, looking at a long, long fall (when you're up there, measurement in feet is meaningless), and then watching the KB shift incrementally down, prayfully to remain catched in the crack.... When later, a subsequent bomber piece arrives, the entire experience is solidly imprinted. Later, the mind labels it as "hard" or "scary", or "A5". Good fun.
Appendices
Appendix 1: Getting Started
Big walls are gear intensive, but its possible to get started on the big stones with a moderate amount of additional gear acquisition, dependent on the amount of improvisation and borrowing that is done. Two climbers each with a standard free-climbing rack and decent camping/bivy gear collectively have about 2/3 of the total gear needed for a moderate nail-up, i.e. Mescalito, Zodiac, or the Shield. The following is a basic checklist of the gear required.
Basic Big-wall Gear Checklist
Hardware (SFG stands for standard free-climbing gear)
2-3 Sets of Friends (SFG)
2-3 sets of wired stoppers (SFG)
2-3 sets of small brass-nuts (SFG)
80 carabiners (SFG)
Hook selection (2 to 5 of the standard types)
Copperhead selection (10-25)
Pitons (5-10 knifeblades, 10-20 horizontals, 15-25 angles)
Small bolt kit (optional)
Personal Wall Gear (per climber)
Harness*
Aiders*
Jumars
Hammer & holster
Headlamp
Rain gear
Wall-boots*
Kneepads and fingerless gloves
Wall spoon and Swiss army knife
Sleeping bag and ensolite
Other Stuff
Haul-bag*
Portaledge*
Double gear sling*
Ropes (2-3)
Tie-offs and runners
Pulley
Stuff sacks for gear/food organization
Water Bottles
Accoutrements, inc. speedy stitcher and duct-tape
Food
The items on the checklist marked with an asterisk are subject to improvisation; a portaledge, for example, can be anything from a plywood sheet rigged with cord or a suspended K-mart lawn chair to the deluxe, manufactured porta-ledges now available. The harness can vary from a simple 2" swami and 1" leg-loops to a custom made padded wall-harness. Aiders can be knotted from 1" web, or sewn. For wall-boots, a sturdy pair of tennis shoes (Lava-domes) is adequate (bring free-climbing shoes, too.) A duct-taped duffel bag may suffice as a haul-bag, or regular back-packs can be used to haul gear (a good, well-manufactured haul-bag made from abrasion-proof materials, however, is worth the investment). Two gear slings can be sewn together (with a speedy stitcher) for an adequate double gear sling.
Learning to aid climb
My first aid ever was nailing up a big tree with 6" nails so that I could set up a rappelling/prussiking station off a branch 30' off the ground. Practicing aid on free-climbing cracks with Friends, nuts, and aiders is good beginning, as would be cleaning such pitches with ascenders. Personalized instruction is helpful, and so is learning with a friend of similar experience (concentrate on safety). Climbing practice aid routes, playing on boulders with hooks, and placing, testing, hanging on gear and making subsequent placements will familiarize one with the basics. If used to free-climbing, the slowness of aid may be a bit unnervy at first.
To prepare for a big-wall, start with the basics on smaller crags, and master them: making placements, moving with aid ladders efficiently, setting up belays, jumaring, cleaning gear effectively, organizing the rack. Then move onto the next step: learning to haul, packing and conveniently organizing the haul bag, deciding upon and organizing the gear needed for a route (proper planning), preserving flesh (shredded hands after a climb are proof of inefficient thrashing), and getting in shape and becoming tough for future harder adventures. Experience and proficiency only come from doing (and not from reading a manual such as this).
Appendix
2:
By no
means is the following a complete list; it is merely a selection of well-known
walls broken down by category. Of course, fine big-wall adventures can be
had off the beaten path--discover them for yourself.
The hard routes listed here really are hard; attempting these without the
proper experience is not only dangerous, but invariably means that bolts will
be added. Moderate routes require a fair amount of experience, and the
all-clean and trade routes merely require
tenacity and good judgement (those with a high degree
of mechanical aptitude generally do well from the start). For more
information on gear and on getting started on
walls, contact A5 Adventures, the big-wall supply shop, at
Getting started--short practice aid routes:
Direct South Face, Rixon's Pinnacle
The Stigma (generally goes all clean, despite the fact that it had to be nailed for the "first free ascent").
Bishop's Terrace (roof)
The Folly, Left Side
All Clean, or nearly all clean routes:
South Face,
The Prow
Lost Arrow Spire, Direct
Half Dome,
The Nose
Salathe
Current Trade Routes:
Lurking Fear
The Shield
Mescalito
Tangerine Trip
Zodiac
Moderate Nailing Routes:
Never-Never-Land
Cosmos
Magic Mushroom
North American Wall
Tis-sa-ack
Liberty Cap, SW Face (Werner's Woot)
South Face of Half Dome
Hard Nailing Routes:
Iron Hawk (medium-hard)
Zenyatta Mendatta (medium hard)
Turning Point
Jolly Rodger
Sheep Ranch
Space
Born Under a Bad Sign
Native Son
The Big Chill (Half Dome)
many others...