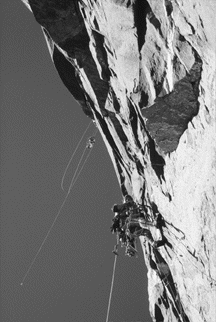
Photo: Xaver Bongard on the Wyoming Sheep Ranch
Climbing sections of rock which are impassable free, yet accept gear to allow progress, is considered aid climbing. Of most importance, aid climbing allows climbers to ascend the long awesome rock walls, faces otherwise unclimbable, located around the world in wild places. Special techniques, skills, and equipment are required. Aid climbing, though more cumbersome and complex than free climbing, is an essential technique for a climber's ability to climb, to ascend the vertical and overhanging.
The scope of this article is to define the A1 to A5 system of grading individual aid pitches. First a note on the overall grading system of a particular big-wall climb. A climb rated Grade VI, 5.10, A4, for example, indicates the the length (the grade VI indicates over a two day climb), the maximum free difficulty (5.10), and the hardest aid pitch (A4). The overall grading system never tells the true story, however. The same Grade VI, 5.10, A4 rating could apply to a 8 pitch, three-day route with merely one pitch of A4, and a short, well-protected section of 5.10. Or it could represent the difficulty of a horrendous, 30 pitch, 10 day nailup, with multiple horror show A4 pitches, and bold unprotected pitches of 5.10. Big-wall climbing is such, however, that the general difficulty of a route becomes apparent in plain sight, and the intimidation which one feels when looking up at a massive chunk of stone roughly proportionates to the effort and skill that will be required to attempt climbing it.
A1: Easy aid: placements straightforward and solid. No risk of any piece pulling out. Aiders generally required. Fast and simple for C1, the hammerless corresponding grade, but not necessarily fast and simple for nailing pitches. Examples: (clean) the non-5.12 version of the Salathe headwall, Prodigal Son on Angel's Landing and Touchstone Wall in Zion.
A2: Moderate aid: placements generally solid but possible awkward and strenuous to place. Maybe a tenuous placement or two above good pro with no fall-danger. Examples: the Right side of El Cap Tower (nailing), Moonlight Buttress and Space Shot in Zion (clean).
A2+: Like A2, but possibly several tenuous placements above good pro. 20 to 30 foot fall potential but with little danger of hitting anything. Route finding abilities may be required. Examples: the new wave grades of Mescalito and the Shield on El Cap, the Kor route on the Titan in the Fisher Towers area.
A3: Hard aid: testing methods required. Involves many tenuous placements in a row. Generally solid placements (which could hold a fall) found within a pitch. Long fall potential up to 50 feet (6-8 placements ripping), but generally safe from serious danger. Usually several hours required to complete a pitch, due to complexity of placements. Examples: The Pacific Ocean Wall lower crux pitches (30 feet between original bolts on manky fixed copperheads), Standing Rock in the desert (the crux being a traverse on the first pitch with very marginal gear with 30 foot swing potential into a corner).
A3+:Like A3, but with dangerous fall potential. Tenuous placements (like a marginal tied-off pin or a hook an a fractured edge) after long stretches of body-weight pieces (here body-weight placements are considered for all practical purposes any piece of gear not solid enough to hold a fall). Potential to get hurt if good judgement is not exercised. Time required generally exceeds 3 hours for experienced aid climbers. Example: Pitch 3 of "Days of No Future" on Angel's Landing in Zion, the crux being 50 feet of birdbeaks and tied-off blades in soft sandstone followed by a blind, marginal Friend placement in loose rock which was hard to test properly, all this above a ledge.
A4: Serious aid: lots of danger. 60 to 100 foot fall potentials common, with uncertain landings far below. Examples: pitches on the Kaliyuga on Half Dome and the Radiator on Abraham in Zion.
A4+: More serious than A4. these leads generally take many hours to complete and require the climber to endure long periods of uncertainty and fear, often requiring a ballet-like efficiency of movement in order not to upset the tenuous integrity of marginal placements. Examples: the "Welcome to Wyoming" pitch (formerly the"Psycho Killer" pitch) on the Wyoming Sheep Ranch on El Cap, requiring 50 feet of climbing through a loose, broken, and rotten Diorite roof with very marginal, scary placements like stoppers wedged in between two loose, shifting, rope-slicing slivers of rock, all this over a big jagged loose ledge which would surely break and maim bones. The pitch is then followed by 100 feet of hooking interspersed with a few rivets to the belay.
A5: Extreme aid. Nothing really trustworthy of catching a fall for the entire pitch. Rating should be reserved only for pitches with no bolts or rivets (holes) for the entire pitch. Examples: pitches on the Jolly Roger and the Wyoming Sheep Ranch on El Cap, Jim Beyer routes in Arches National Park and the Fisher Towers.
A6: (Theoretical grade) A5 climbing with marginal belays which will not hold a fall.
Click here to read about Xaver Bongard's experience on hard aid.
 RETURN TO INDEX